

Caterpillar 6018AC, 6018ACFS Hydraulic Shovel Operation And Maintenance Manual 3847022
$30.00
- Type Of Manual: Operation And Maintenance Manual
- Manual ID: 3847022
- Number of Pages: 228
- Size: 4.6MB
- Format: PDF
Product details
-
Model List:
- 6018AC, 6018ACFS Hydraulic Shovel
- 1. TITLEPAGE
- 2. INTRODUCTION
- 2.1. PREFACE
- 2.2. WARRANTY
- 2.3. FUNDAMENTAL SAFETY INSTRUCTIONS
- 2.3.1. Warnings and symbols
- 2.4. DESIGNATED USE
- 3. OPERATION
- 3.1. OPERATION – SAFETY INSTRUCTIONS
- 3.1.1. Operating instructions
- 3.1.2. Pay special attention to
- 3.1.3. Operating personnel
- 3.1.4. Personal protective gear and working clothing
- 3.1.5. Safety belt
- 3.1.6. State of the machine
- 3.1.7. Entering and leaving the machine
- 3.1.8. Hazard range
- 3.1.9. Persons within the hazard zone
- 3.1.10. Marshallers
- 3.1.11. Securing the machine
- 3.1.12. Operating Instructions, where to store it in the drivers cab
- 3.2. FIRE AND EXPLOSION HAZARD
- 3.3. DESCRIPTION OF THE EXCAVATOR
- 3.3.1. Excavator layout
- 3.3.2. Undercarriage
- 3.3.3. Superstructure
- 3.3.4. Hydraulic system
- 3.3.5. Pump Managing System (PMS)
- 3.3.6. Stored Program Control (SPC)
- 3.3.7. Control Management System (CMS)
- 3.3.8. Demand control / Zero-flow regulation
- 3.3.9. Board-Control-System (BCS)
- 3.3.10. Electrical system
- 3.3.11. Power supply
- 3.3.12. Entering and leaving the machine, Safety instructions
- 3.3.13. Access lighting
- 3.3.14. Swinging ladder
- 3.3.15. Folding ladder (optional)
- 3.3.16. Cab interior lamp
- 3.3.17. Servicing lighting
- 3.3.18. Illuminating the control column
- 3.3.19. EMERGENCY STOP switch
- 3.3.20. Servicing switch
- 3.3.21. Windscreen washer
- 3.3.22. Drivers seat
- 3.3.23. Fire extinguisher
- 3.3.24. Automatic fire-extinguishing system (optional)
- 3.3.25. Trainers / instructors seat
- 3.3.26. Emergency escape device (optional)
- 3.4. MONITORING, WARNING AND CONTROL ELEMENTS
- 3.5. PUTTING THE MACHINE INTO OPERATION
- 3.5.1. Service station (tanklift)
- 3.5.2. Battery main switch, switching on and off
- 3.5.3. Electrical system (24V), switching on and off
- 3.5.4. Switching the electric motor on and off
- 3.5.5. Time-out before restart
- 3.5.6. Electric motor can not be switched on
- 3.5.7. In case of failure
- 3.5.8. Circuit breaker, switching on and off
- 3.5.9. Motor protection relay, function
- 3.5.10. Air conditioner (option)
- 3.6. TRAVELLING
- 3.6.1. DRIVING SAFETY INSTRUCTIONS
- 3.6.2. TRAVELLING
- 3.6.3. Locking the superstructure
- 3.6.4. Track parking brake
- 3.7. TRANSPORTING THE MACHINE
- 3.7.1. Transport – Safety instructions
- 3.8. WORKING OPERATION
- 3.8.1. Safety instructions
- 3.8.2. Working equipment, avoid extreme positions
- 3.9. WORKING OPERATION
- 3.9.1. Before starting work
- 3.9.2. Swinging the superstructure
- 3.9.3. Braking the superstructure
- 3.9.4. Working
- 3.9.5. Emergency lowering of the working equipment
- 3.9.6. After daily operation
- 3.10. ASSEMBLING WORKING EQUIPMENT – SAFETY INSTRUCTIONS
- 3.10.1. Personel
- 3.10.2. Personal protective gear and working clothes
- 3.10.3. Tools and auxiliaries
- 3.10.4. Securing the working equipment
- 3.10.5. Securing the machine
- 3.10.6. Selecting the attachments
- 3.10.7. Protective roof against falling objects
- 3.10.8. Securing the machine
- 3.11. CORROSION PROTECTION FOR PINS AND BEARINGS (BUSHINGS AND HUBS)
- 3.11.1. Application of GLEITMO 815
- 4. INSPECTION AND SERVICING
- 4.1. SAFETY INSTRUCTIONS FOR EXCAVATORS WITH ELECTRIC MOTOR
- 4.1.1. In the transformer station
- 4.1.2. On the excavator
- 4.1.3. On the hydraulic excavator
- 4.1.4. In the transformer station
- 4.1.5. On the hydraulic excavator
- 4.2. INSPECTION AND SERVICING – SAFETY INSTRUCTIONS
- 4.2.1. Operating manual
- 4.2.2. Inspection and servicing personnel
- 4.2.3. Personal protective equipment and working clothing
- 4.2.4. Securing the working equipment
- 4.2.5. Securing the machine
- 4.2.6. Climbing onto and off the machine
- 4.2.7. Checking the state of tools
- 4.2.8. Cleaning jobs
- 4.2.9. Handling flammable liquids
- 4.2.10. Fastening and securing elements
- 4.2.11. Spare parts
- 4.2.12. Handling oils and greases
- 4.2.13. Visisble oil losses
- 4.2.14. Relieving residual pressure in the hydraulic system
- 4.2.15. Screwed connections, piping, hydraulic hoses
- 4.2.16. Non-polluting disposal
- 4.2.17. Handling batteries
- 4.2.18. Before working on the electrical system
- 4.2.19. Selecting oils and greases
- 4.2.20. Filters
- 4.2.21. Sealing elements
- 4.2.22. Oil-level check and oil change
- 4.2.23. Lubricating
- 4.2.24. After servicing
- 4.3. FIRE AND EXPLOSION HAZARD
- 4.4. INSPECTION AND SERVICING PLANS – INSTRUCTIONS
- 4.4.1. Intervals
- 4.4.2. Oils / Greases
- 4.4.3. Cleaning jobs
- 4.4.4. Components
- 4.4.5. Plan V
- 4.4.6. Plan N
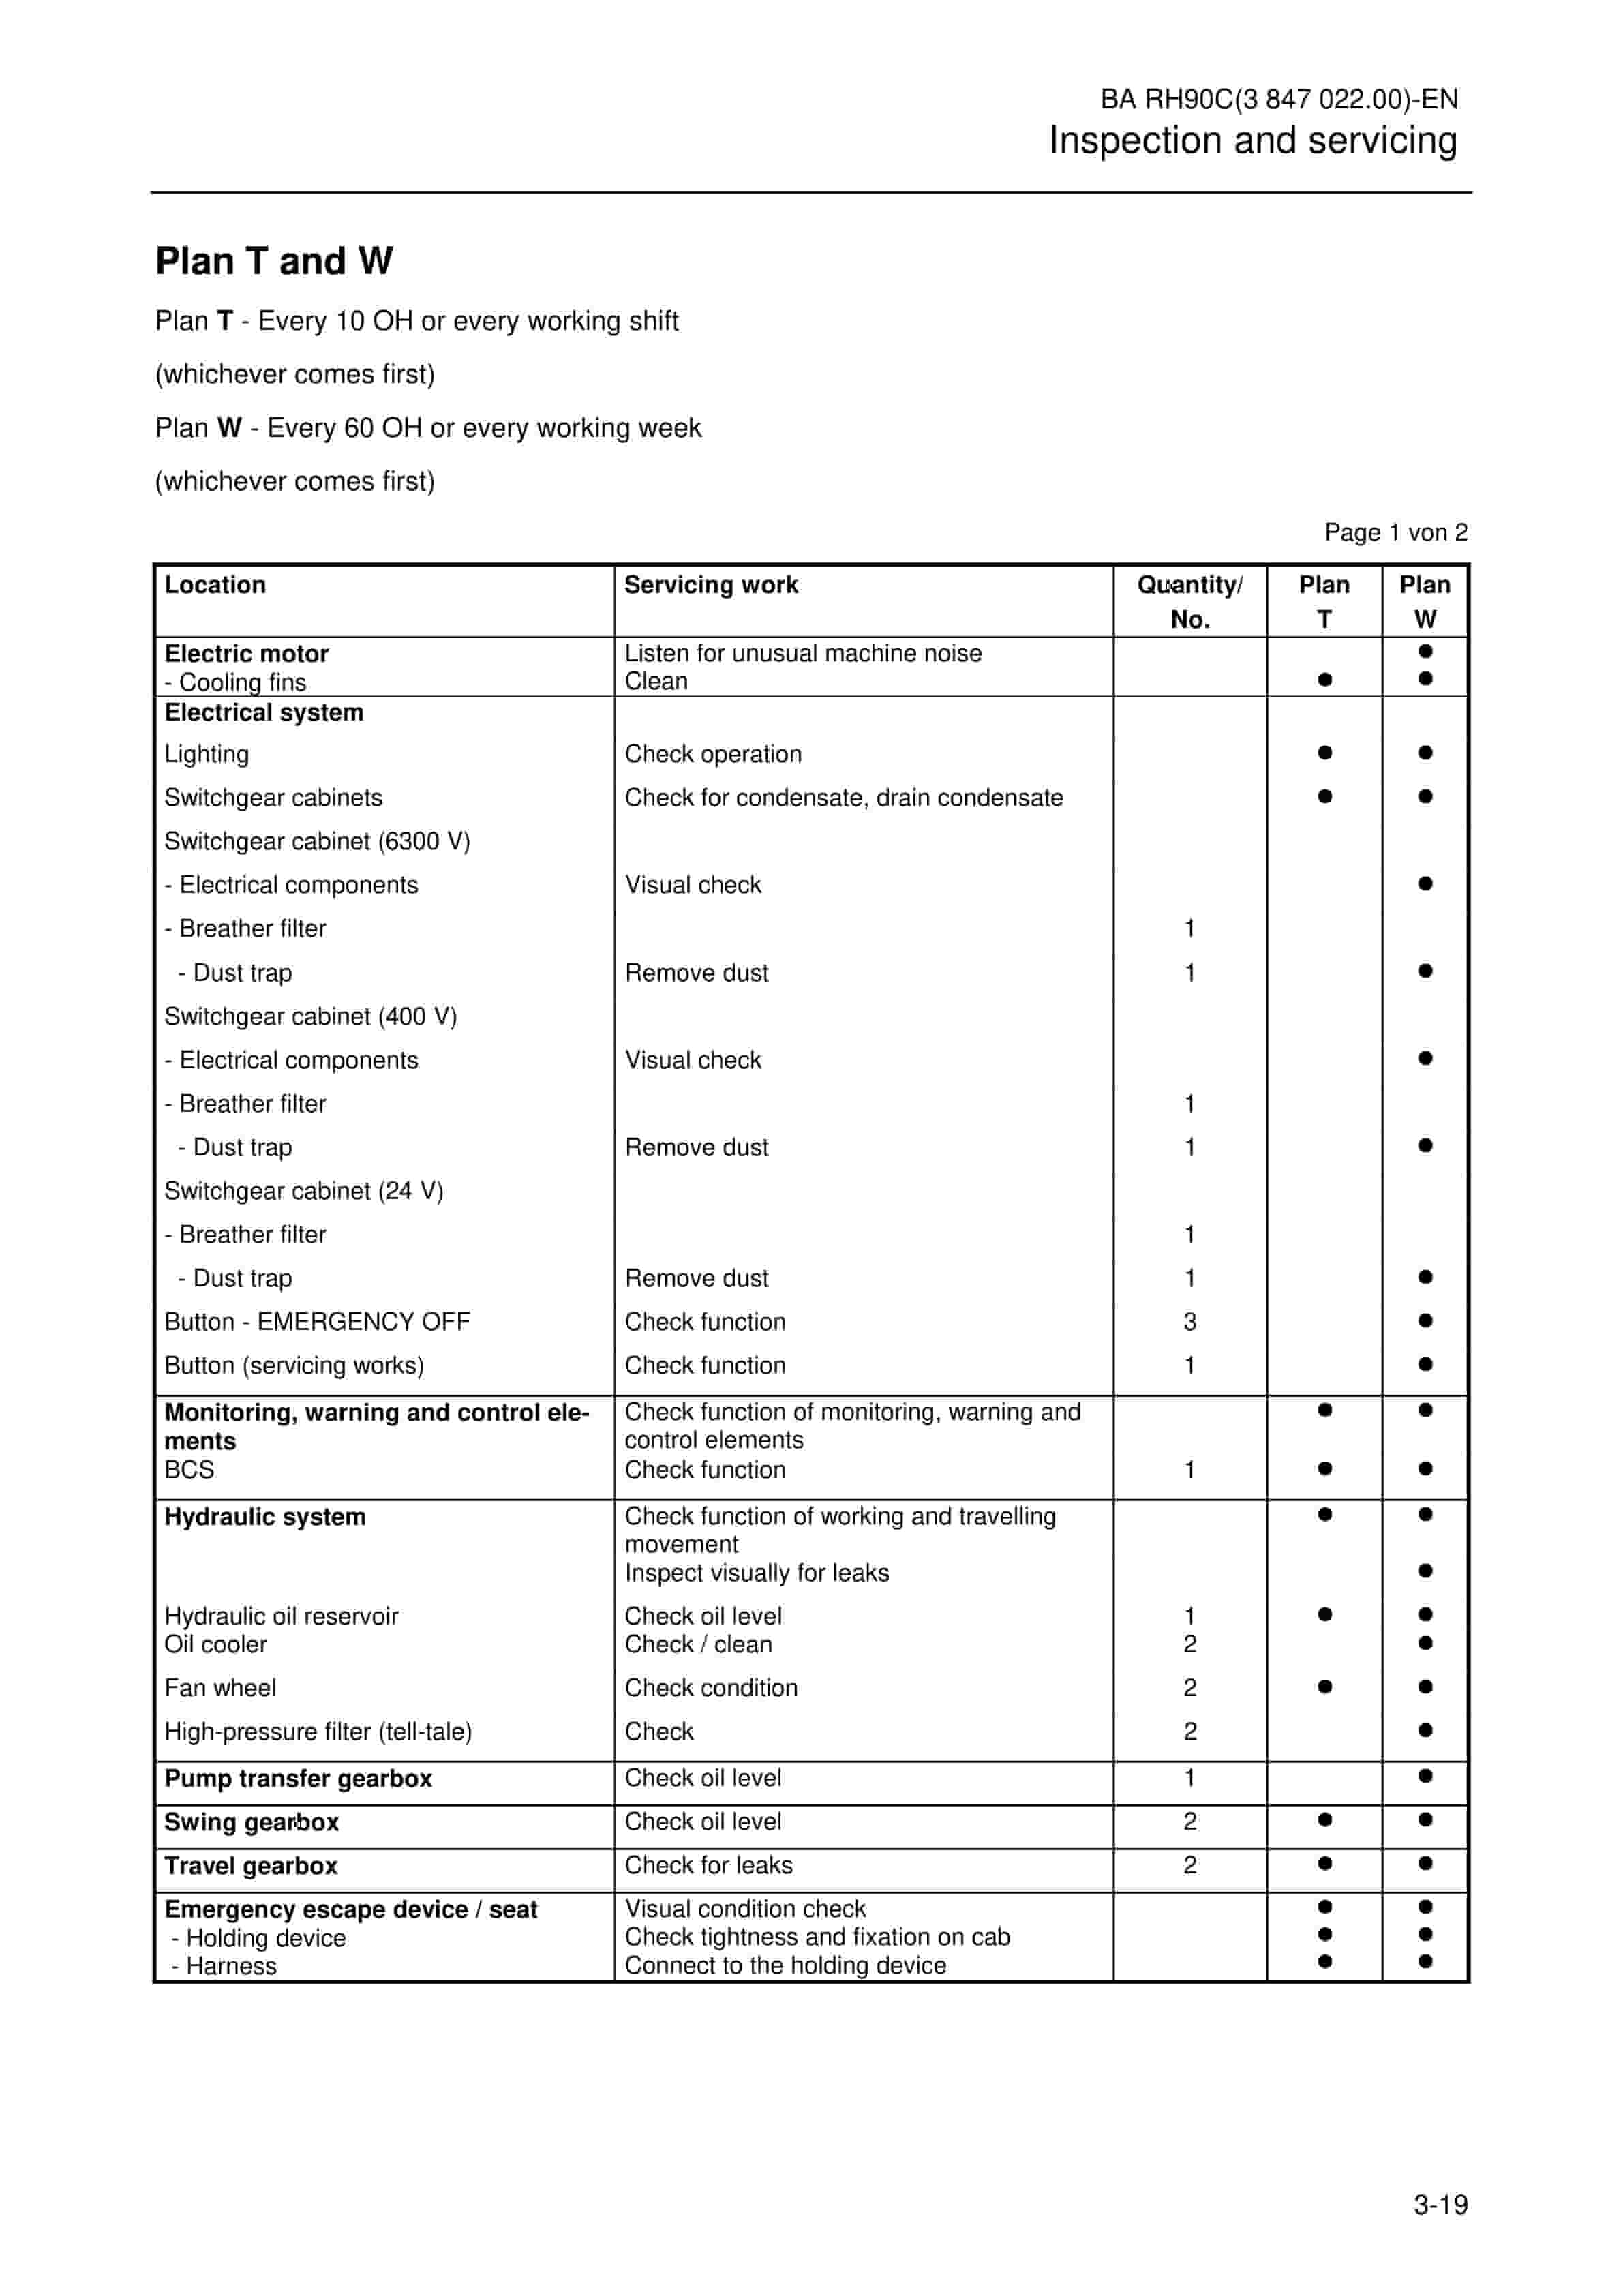
- 4.4.7. Plan T and W
- 4.4.8. Plan A E
- 4.5. LUBRICATING CHART GREASE
- 4.5.1. Lubricating chart Grease (legend)
- 4.5.2. Filling quantities – Grease
- 4.6. INSPECTION PLAN – OIL
- 4.6.1. Inspection plan Oil (legend)
- 4.6.2. Filling quantities – oil
- 4.6.3. Filling quantities – other
- 4.7. LUBRICANTS
- 4.7.1. Notes on the selection of oils and greases
- 4.7.2. Avoid mixing of different hydraulic fluids
- 4.7.3. II. Oil for hydraulic system
- 4.7.4. III.a Oils for pump gearbox
- 4.7.5. III.b Oils for swing gearboxes
- 4.7.6. III.c Oils for travel gearboxes
- 4.7.7. Greases for bearings and swing rings
- 4.8. SERVICING WORK
- 4.8.1. Hose line for oil changes
- 4.9. ELECTRIC MOTOR
- 4.9.1. Electric motor – Safety instructions
- 4.9.2. Cleaning the electric motor
- 4.9.3. Electric motor, greasing
- 4.10. ELECTRICAL SYSTEM
- 4.10.1. Electrical system – Safety instructions
- 4.10.2. Battery main switch
- 4.10.3. Battery
- 4.10.4. Switchgear cabinet
- 4.10.5. Slip ring maintenance
- 4.10.6. Floodlight projector, replacing the lamp
- 4.11. HYDRAULIC SYSTEM
- 4.11.1. Hydraulic system – Safety instructions
- 4.11.2. Depressurizing the hydraulic system
- 4.11.3. Checking the hydraulic oil level
- 4.11.4. Changing the hydraulic oil return-flow filter (hydraulic oil reservoir)
- 4.11.5. Bypass valves (hydraulic oil reservoir)
- 4.11.6. Breather filter
- 4.11.7. Filter (control circuit)
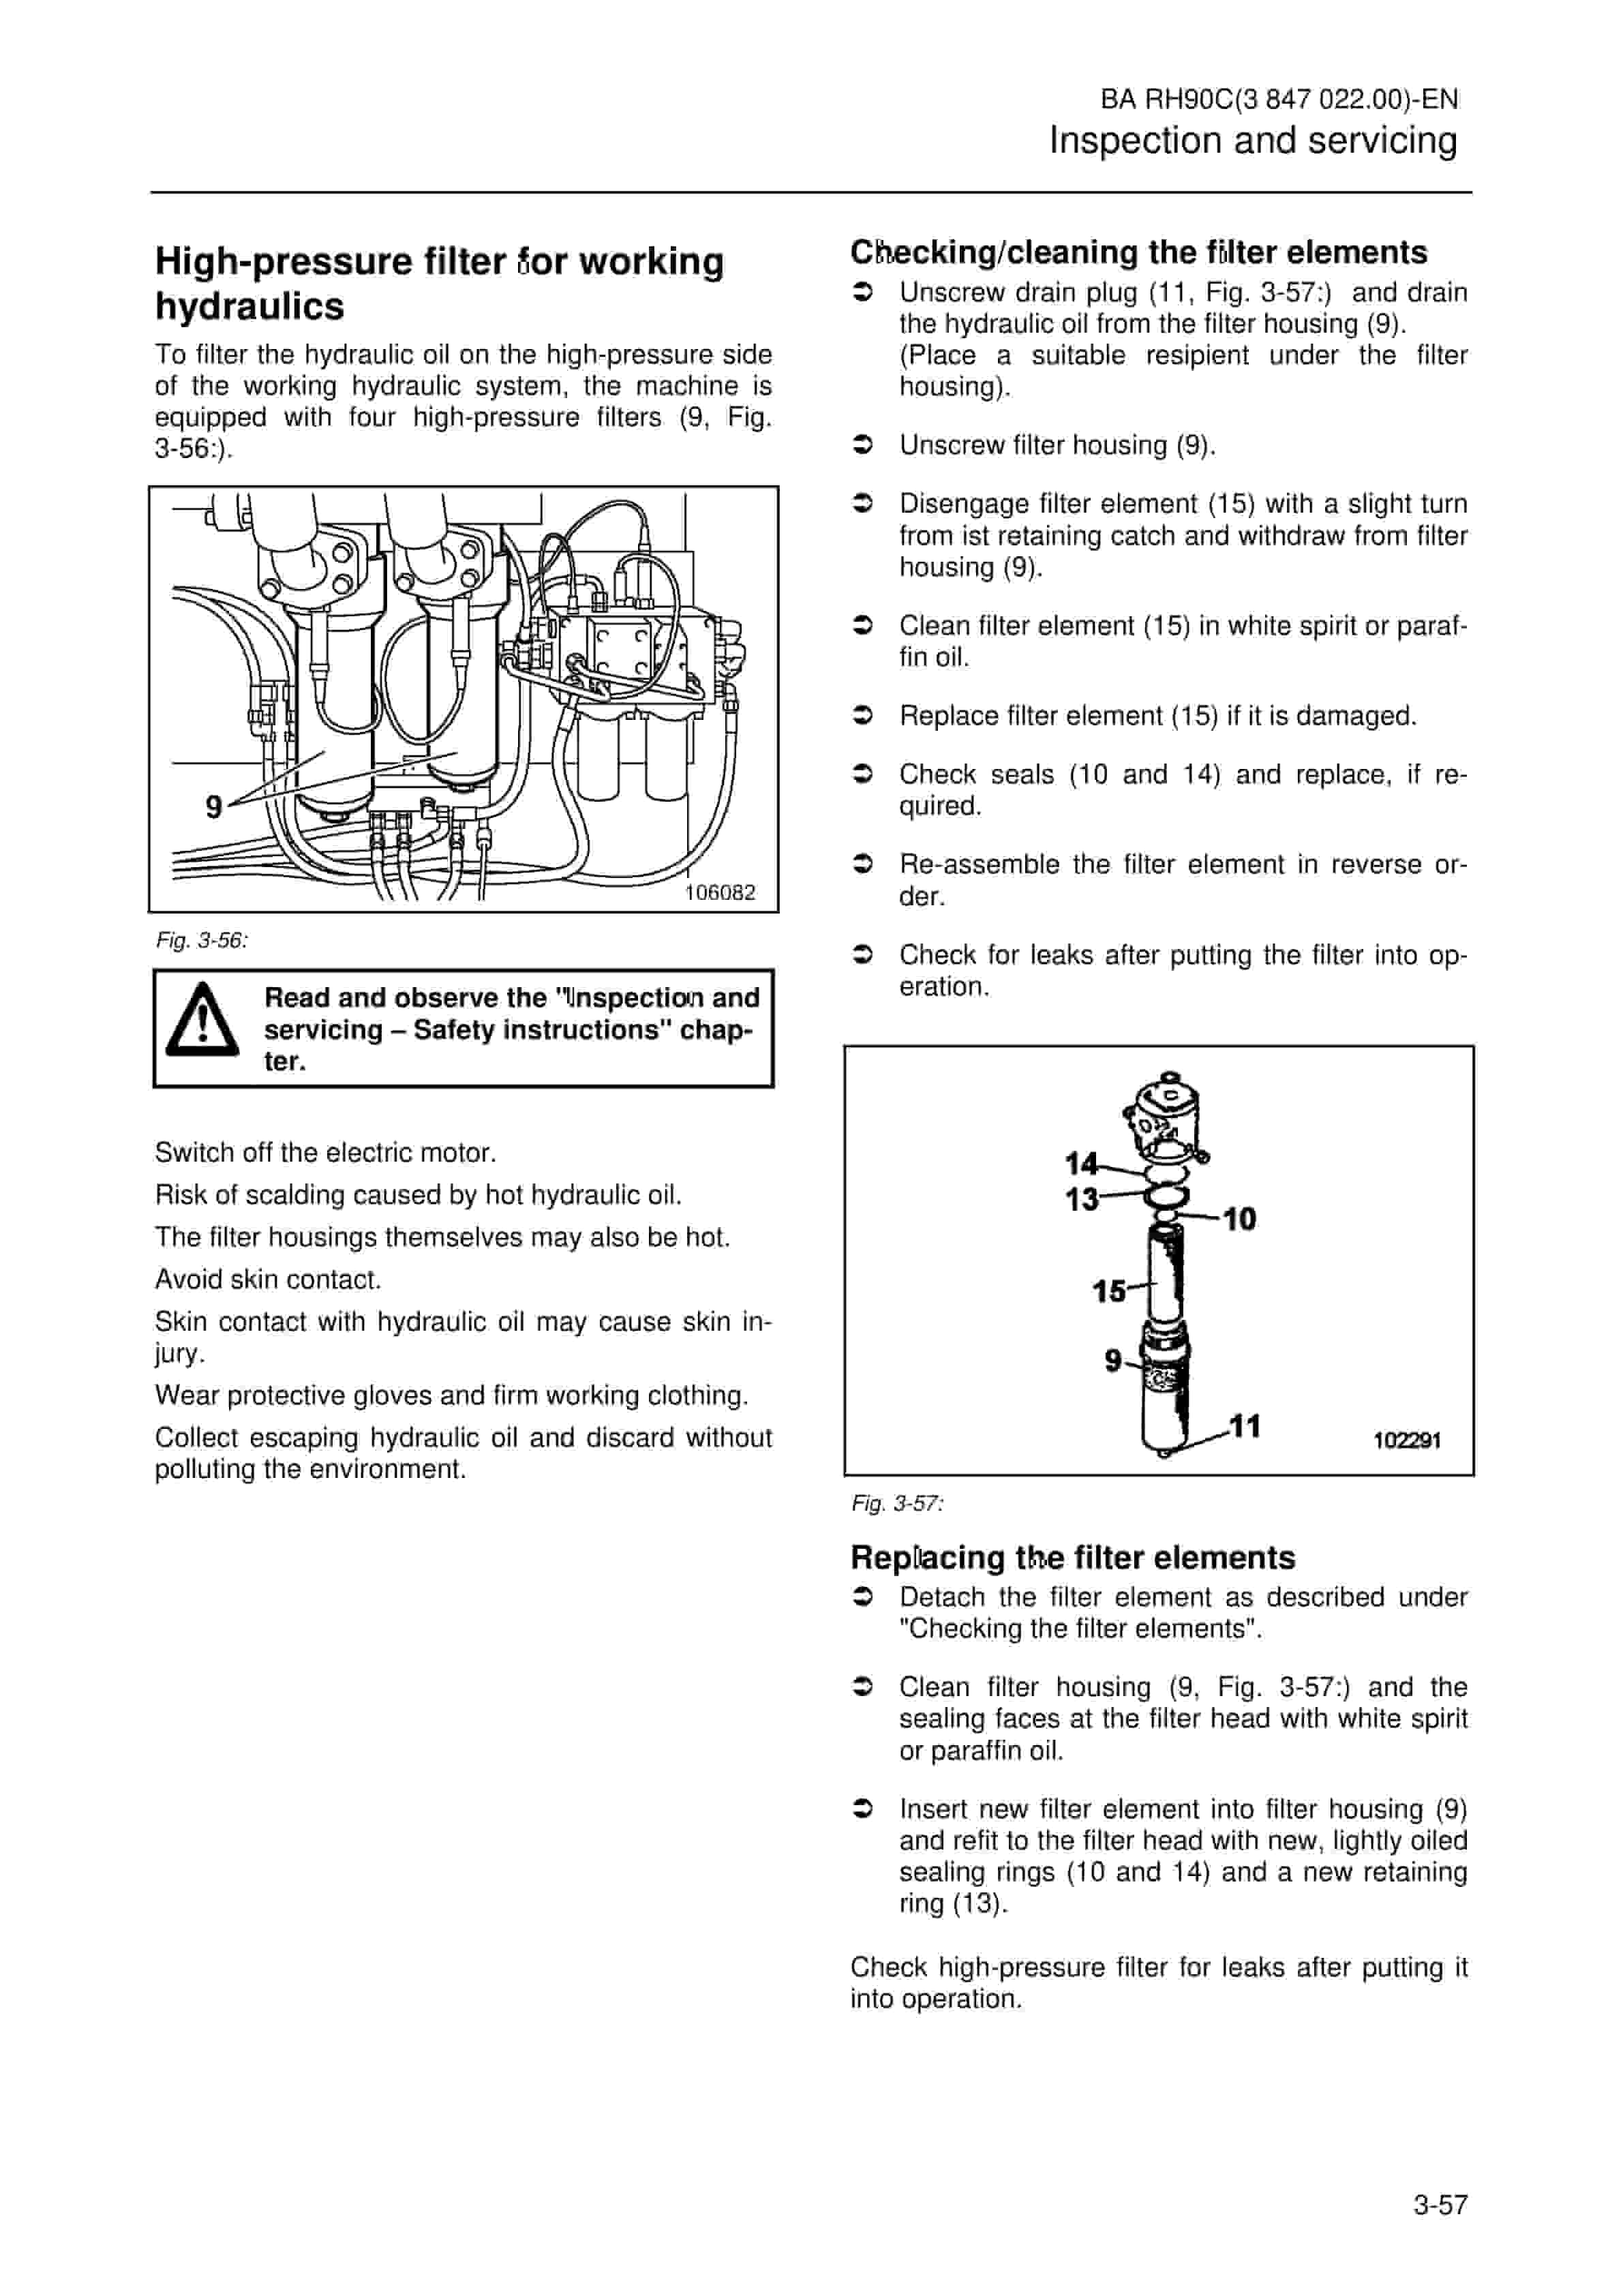
- 4.11.8. High-pressure filter for working hydraulics
- 4.11.9. High-pressure filters for servo circuit
- 4.11.10. High-pressure filters for feeding circuit
- 4.11.11. Changing the hydraulic oil
- 4.11.12. Avoid mixing of different hydraulic fluids
- 4.11.13. Venting the hydraulic system
- 4.11.14. Cleaning the hydraulic oil cooler
- 4.11.15. Electronic excavator control
- 4.11.16. Pressure accumulator – Emergency lowering
- 4.12. PUMP TRANSFER GEARBOX
- 4.12.1. Checking the gearbox oil level / Topping up with oil
- 4.12.2. Changing the pump gearbox oil
- 4.13. SWING GEARBOX
- 4.13.1. (Valid for swing gearbox P/N 3696062)
- 4.13.2. Swing gearbox – Checking the oil level / Topping up with oil
- 4.13.3. Changing the swing gearbox oil
- 4.13.4. Swing gearbox venting
- 4.14. SWING GEARBOX
- 4.14.1. (Valid for swing gearbox P/N 3696026)
- 4.14.2. Swing gearbox – Checking the oil level / Topping up with oil
- 4.14.3. Changing the swing gearbox oil
- 4.14.4. Swing gearbox venting
- 4.15. TRAVEL GEARBOX
- 4.15.1. Travel gearbox – Checking the oil level / Topping up with oil
- 4.15.2. Travel gearbox – Changing oil
- 4.16. CRAWLER TRACKS
- 4.16.1. Cleaning
- 4.16.2. Track roller, Support roller
- 4.16.3. Track pads fastening
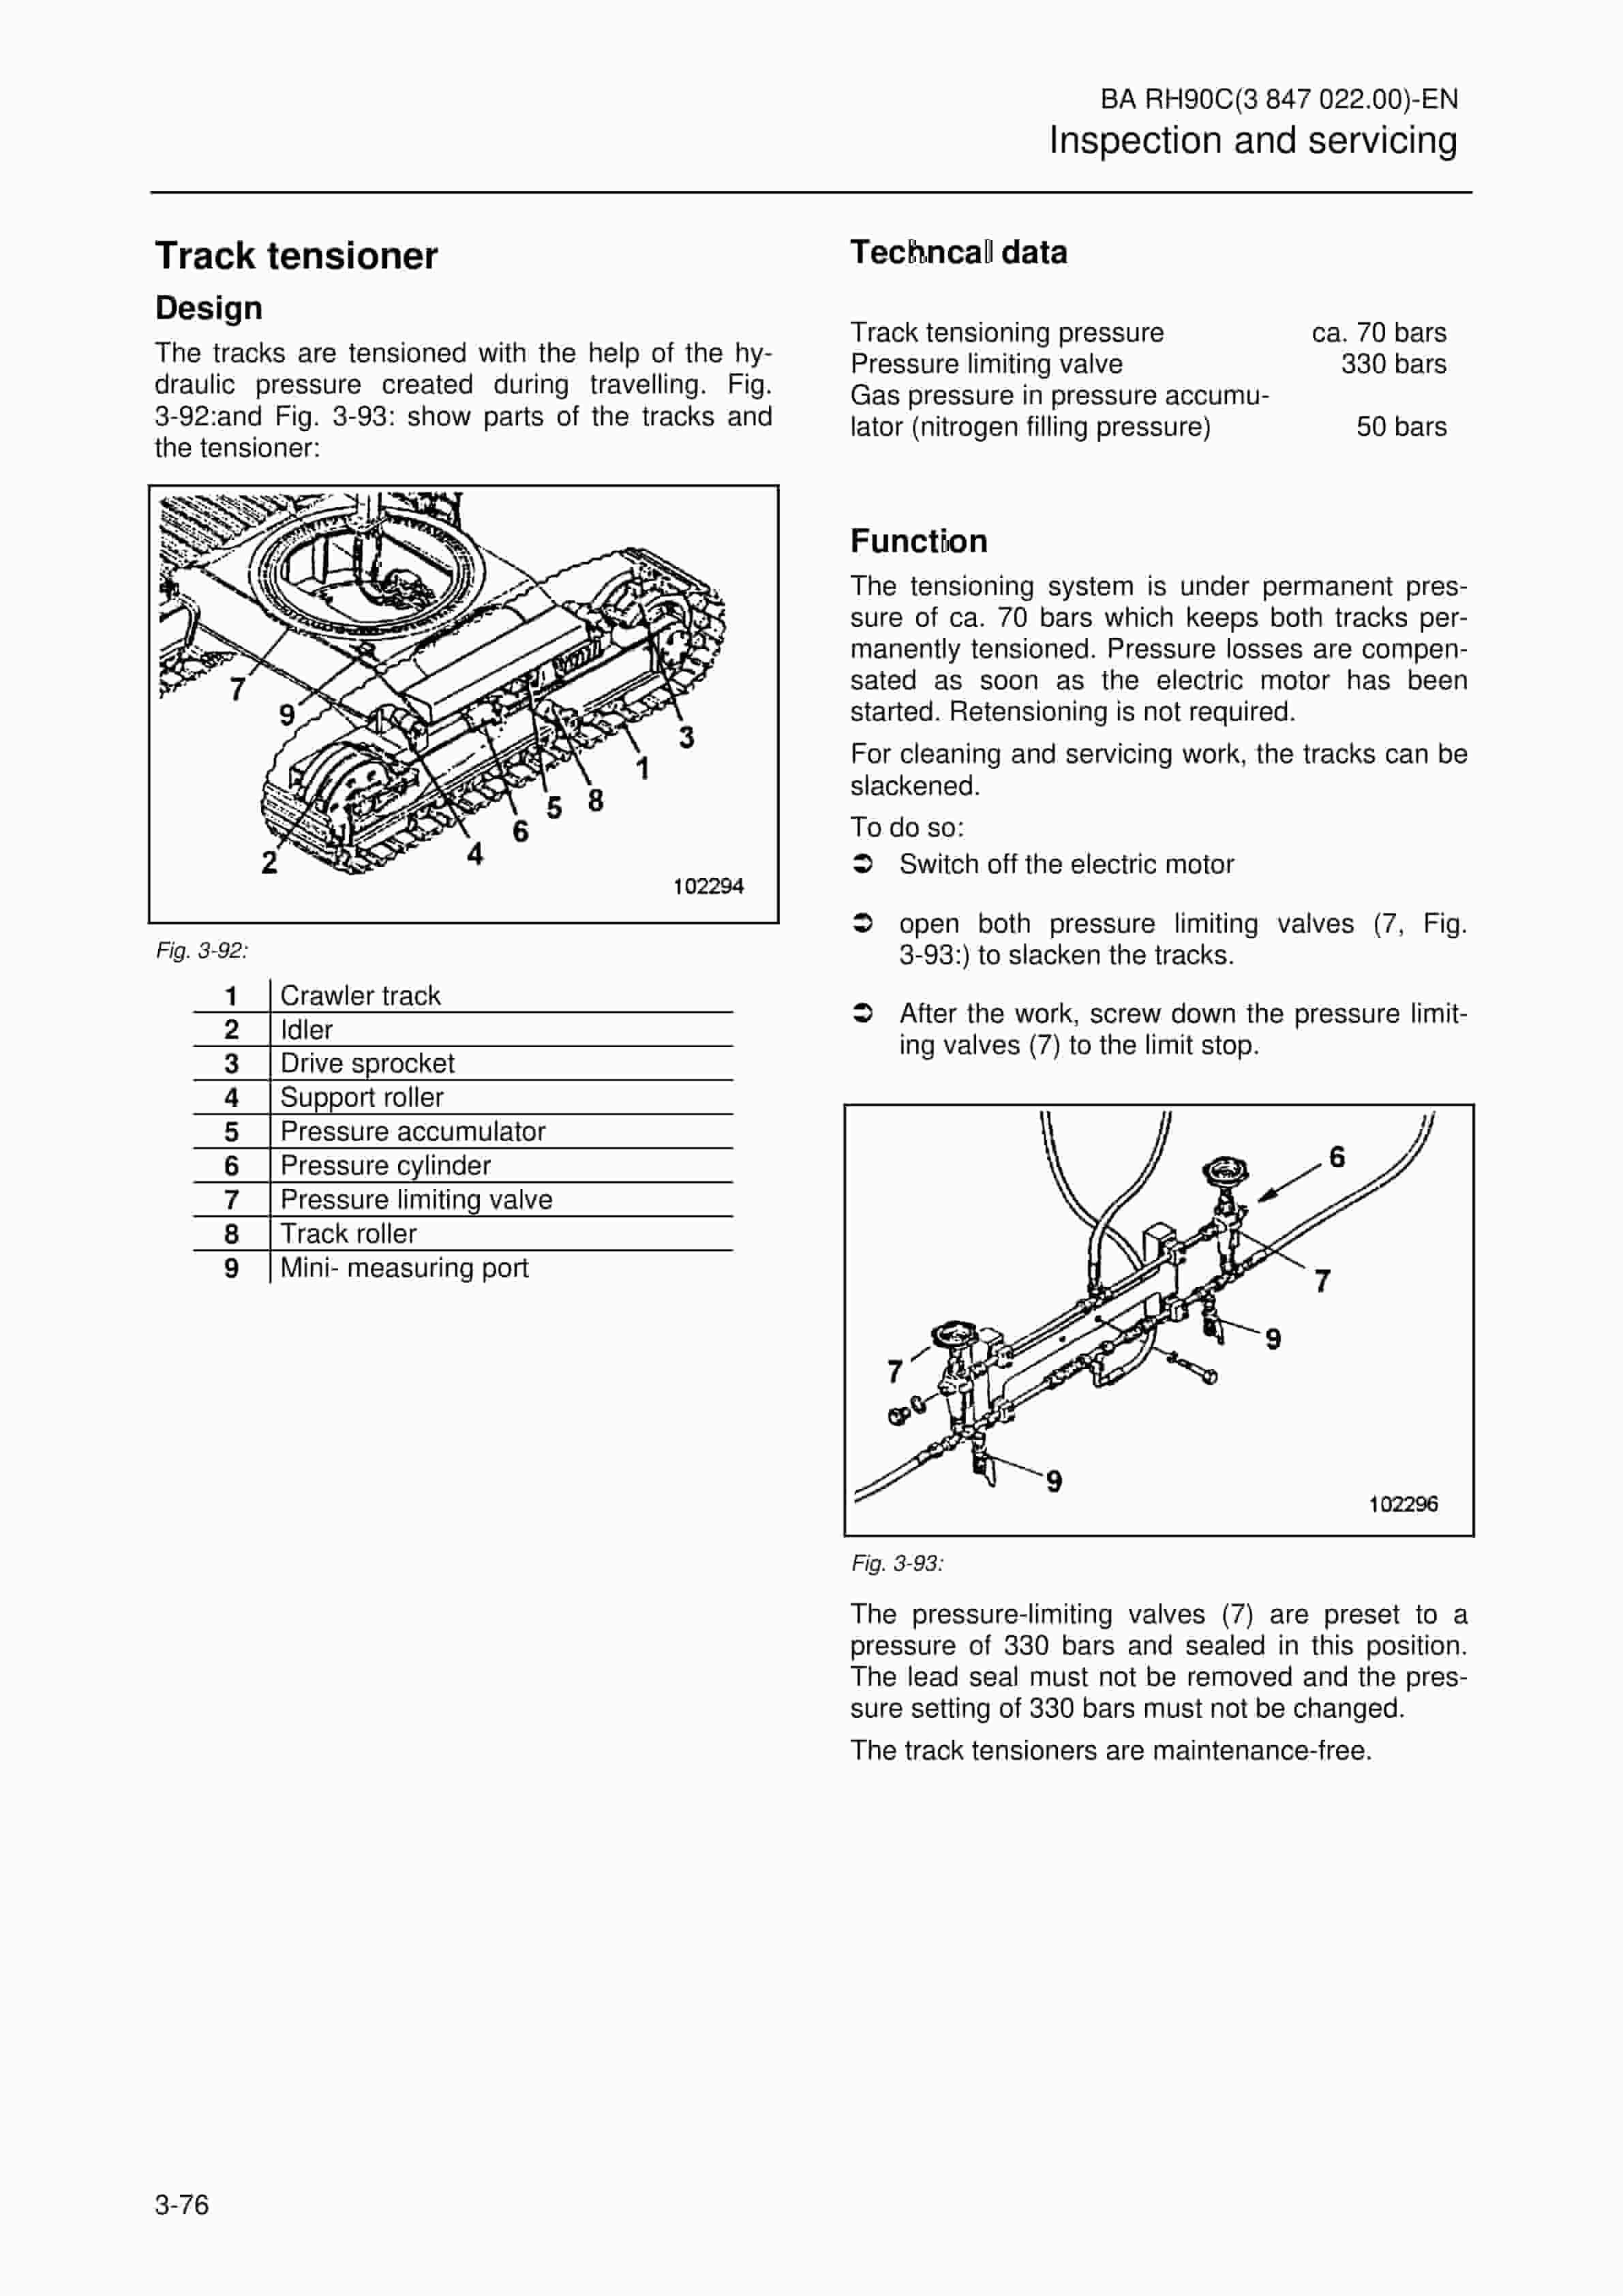
- 4.16.4. Track tensioner
- 4.16.5. Pressure-accumulator inspection regulations
- 4.16.6. Checking the gas charging pressure in the pressure accumulator
- 4.17. SWING RING
- 4.17.1. Swing ring Instructions
- 4.17.2. Bearing races
- 4.18. CENTRAL LUBRICATING
- 4.18.1. Design
- 4.18.2. Function
- 4.18.3. Replacing the grease drum
- 4.18.4. Checking the greasing pressure
- 4.18.5. Unblocking a grease line.
- 4.18.6. Oilfilter (hydraulic circuit grease pump) )
- 4.18.7. Grease filter (Grease lines)
- 4.19. OTHER MAINTENANCE
- 4.19.1. Additional oil cooling
- 4.19.2. Heating and air conditioning
- 4.20. PUTTING THE EXCAVATOR OUT OF OPERATION AND RECOMMISSIONING
- 4.20.1. Putting the excavator out of operation
- 4.20.2. Battery storage
- 4.20.3. Recommissioning
- 4.21. NOTES
- 5. REPAIR WORK
- 5.1. SAFETY INSTRUCTIONS FOR EXCAVATORS WITH ELECTRIC MOTOR
- 5.1.1. In the transformer station
- 5.1.2. On the excavator
- 5.1.3. On the hydraulic excavator
- 5.1.4. In the transformer station
- 5.1.5. On the hydraulic excavator
- 5.2. REPAIR WORK – SAFETY INSTRUCTIONS
- 5.2.1. Operating instructions
- 5.2.2. Repair personnel
- 5.2.3. Working in greater heights
- 5.2.4. Prestressed units
- 5.2.5. Dismantling components
- 5.2.6. Never remove lead seals
- 5.2.7. After the repair work
- 5.3. FIRE AND EXPLOSION HAZARD
- 5.4. HYDRAULIC SYSTEM
- 5.4.1. Repair instructions
- 5.4.2. Hydraulic hoses Instructions
- 5.5. PRESSURE ACCUMULATORS – SAFETY INSTRUCTIONS
- 5.6. WELDING OPERATIONS – SAFETY INSTRUCTIONS
- 5.6.1. Welding operations only by trained personnel
- 5.6.2. Pressurized vessels and pressure accumulators
- 5.6.3. Swing joints and hinges
- 5.6.4. Notes on the electric system
- 5.6.5. Additional information
- 6. ANNEX
- 6.1. TROUBLESHOOTING
- 6.1.1. Instructions on troubleshooting
- 6.1.2. Layout of the fault table
- 6.1.3. Possible causes
- 6.1.4. Measures
- 6.1.5. Section
- 6.2. FAULT TABLES
- 6.2.1. Working hydraulics Fault table
- 6.2.2. Track drive Fault table
- 6.2.3. Swing mechnism Fault table
- 6.2.4. Central lubricating system Fault table
- 6.3. HYDRAULIC CIRCUIT DIAGRAM
- 6.4. ABBREVIATIONS
- 6.5. ABBREVIATIONS
- 6.6. TECHNICAL DATA
- 6.6.1. S-Spec_Sheet
- 7. INDEX
Related products
-
Caterpillar CM345-N Continuous Miner Operation And Maintenance Manual A6474X315
$30.00 Add to cart -
Caterpillar CM345 Continuous Miner Operation And Maintenance Manual BI001589
$30.00 Add to cart -
Caterpillar CM235 Continuous Miner Operation And Maintenance Manual A6474X454
$30.00 Add to cart -
Caterpillar CM345-N Continuous Miner Operation And Maintenance Manual BI001588
$30.00 Add to cart -
Caterpillar CM340 Continuous Miner Operation And Maintenance Manual BI001579
$30.00 Add to cart


