


Caterpillar EP10CB-35CB Lift Trucks Operation and Maintenance Manual OCFEM-M22C0-200
$30.00
- Type Of Manual: Operation and Maintenance Manual
- Manual ID: OCFEM-M22C0-200
- Number of Pages: 230
- Size: 29.7MB
- Format: PDF
-
Model List:
- EP10CB, EP15CB, EP18CB, EP20CB, EP25CB, EP20LCB, EP25LCB, EP30CB, EP35CB
- 1. INTRODUCTION
- 2. CONTENTS
- 3. READ FIRST
- 3.1. Read first
- 3.2. For the manager
- 3.2.1. Qualification for operating
- 3.2.1.1. Handling a new truck
- 3.2.1.2. Warranty and after-sales service
- 3.2.1.3. About inspection
- 3.2.1.4. Enforce periodic replacement of regular replacement parts
- 3.2.1.5. Genuine parts
- 3.3. Regarding the operation manual
- 3.3.1. How to read this manual
- 3.3.1.1. Special considerations in this manual
- 3.3.1.2. Description of posted truck
- 3.3.1.3. Attachment
- 4. FOR SAFE AND COMFORTABLE OPERATION
- 4.1. Before starting to use
- 4.1.1. Perform pre-operation inspection (Daily inspection)
- 4.2. For managers (Operator should read also)
- 4.2.1. Appointment of operator
- 4.2.1.1. Plan, Working place
- 4.2.1.2. Main use / non-use
- 4.2.1.3. About the truck
- 4.2.1.4. About load to handle
- 4.2.1.5. About inspection
- 4.2.1.6. Transportation of truck by trailer
- 4.2.1.7. Fixing method when transferring trucks
- 4.3. Precautions when traveling
- 4.4. Precautions for load handling
- 4.5. Stop, Parking
- 4.6. Precautions for inspection
- 4.7. To prevent truck fires
- 4.8. In case of emergency
- 4.8.1. In case the brakes do not work
- 4.8.2. When the forks stops going down
- 4.8.3. In case of emergency
- 4.9. To prevent tipping over
- 4.9.1. Characteristics of a truck (Center of gravity, stability)
- 4.9.1.1. Maintain truck balance
- 4.9.1.2. Determine the center of gravity of your load
- 4.9.1.3. Change in the center of gravity position (Understand the composite center of gravity position)
- 4.9.1.4. Center of gravity stability area (Center of gravity triangle)
- 4.9.1.5. Maximum loading capacity
- 4.9.1.6. Factors affecting the stability of trucks
- 4.10. Danger / Warning / Caution and instruction labels
- 4.10.1. Danger / Warning / Caution labels
- 4.10.1.1. Do not jump off the truck when tipping over (①)
- 4.10.1.2. Caught by mast moving (②)
- 4.10.1.3. Be careful with pinch fingers (③)
- 4.10.1.4. Handling of the battery (④)
- 4.10.1.5. No entry (⑤)
- 4.10.1.6. Precautions for use (⑥)
- 4.10.1.7. Precautions when charging (⑦)
- 4.10.1.8. Beware of electric shock (⑧)
- 4.10.1.9. Precautions to prevent battery dropout (⑨)
- 4.10.1.10. For safety notice following warnings (⑩)
- 4.10.1.11. Headguard, backrest (⑪)
- 4.10.1.12. Parking brake (⑫)
- 4.10.1.13. Alarm must sound (⑬)
- 4.10.1.14. Replace seat (⑭)
- 4.10.1.15. Attention to matching rim (1.0 to 1.8 ton pneumatic tire only) (⑮)
- 4.10.1.16. Attention to battery side loading Option (⑯)
- 4.10.1.17. Attention of laser beam of laser pointer Option (Part 1) (⑰)
- 4.10.1.18. Attention of laser beam of laser pointer Option (Part 2) (⑱)
- 4.10.1.19. Attention to blue light Option (⑲)
- 4.10.1.20. Careful handling of clamp lockout Option (⑳)
- 4.10.2. Instruction label
- 4.10.2.1. Truck name plate (a)
- 4.10.2.2. Mast label (b)
- 4.10.2.3. Lubrication chart label (c)
- 4.10.2.4. OK mark (d)
- 4.10.2.5. Gas spring operation method (e)
- 4.10.2.6. Hoisting point (f)
- 4.10.2.7. Hydraulic oil filler (g)
- 4.10.2.8. Specification of hydraulic oil (h)
- 4.10.2.9. Connection status of the battery electrolyte level sensor (i)
- 4.10.2.10. Refill water (Automatic battery fluid supply) Option (j)
- 4.10.2.11. Operating method of optional single hydraulic lever (k)
- 4.10.2.12. Manual is missing (l)
- 4.11. Name plate, Serial number
- 4.11.1. Chassis serial number
- 4.11.1.1. Name plate
- 4.11.1.2. Mast label
- 5. HANDLING OF EACH DEVICE
- 5.1. Function
- 5.1.1. Safety function
- 5.1.1.1. Neutral safety control
- 5.1.1.2. OIS control (OISOperator Interlock System)
- 5.1.2. Support function
- 5.1.2.1. Parking brake warning
- 5.1.2.2. Pitching control
- 5.1.2.3. Accelerator-off regeneration
- 5.1.2.4. Auto power-off control
- 5.1.2.5. Laser pointer Option
- 5.1.2.6. Automatic tilt horizontal stop Option
- 5.1.2.7. S-Assist control Option
- 5.2. Meter panel screen
- 5.2.1. Meter panel screen
- 5.2.1.1. Simple table of contents for meter panel screen
- 5.2.2. Meter panel screen basic flow
- 5.2.3. Meter panel switch
- 5.2.4. Mode display
- 5.2.4.1. ECO mode
- 5.2.5. Normal screen
- 5.2.5.1. Name of parts on the normal screen
- 5.2.5.2. Battery discharge indicator (BDI)
- 5.2.5.3. Lift interrupt at over discharging (Lift lock by discharge level) Option
- 5.2.5.4. Turtle mode (Travel speed limit)
- 5.2.5.5. Main meter panel
- 5.2.5.6. Icon display
- 5.2.5.7. Laser pointer icon Option
- 5.2.5.8. Error code display and Abnormal code display
- 5.2.6. Operation results
- 5.2.6.1. Basic rules of operation result screen flow
- 5.2.6.2. Table of operation result screen
- 5.2.6.3. How to reset LAP
- 5.2.7. User settings
- 5.2.7.1. Basic rules for user setting screen flow
- 5.2.7.2. User setting screen list
- 5.2.7.3. How to change setting items (including date and time setting method)
- 5.2.7.4. C (Customize) mode setting confirmation flow details
- 5.2.7.5. Setting method of tare (load weight indicator) Option
- 5.2.8. Simple PIN code (password) entry Option
- 5.2.8.1. PIN code (password) input method
- 5.2.8.2. How to enter
- 5.2.9. Manager PIN code (password) entry
- 5.2.9.1. PIN code (password) input method
- 5.2.9.2. How to enter
- 5.2.10. Manager settings
- 5.2.10.1. Basic rules of manager setting screen flow
- 5.2.10.2. List of manager setting screen (Simplified version)
- 5.2.10.3. Custom feeling setting flow details
- 5.2.10.4. How to change setting items
- 5.2.11. Maintenance timer
- 5.2.11.1. Types of maintenance timer display
- 5.3. Name of each part
- 5.3.1. Name of each part (Appearance)
- 5.3.1.1. Name of each part (Around operators seat)
- 5.4. How to use the switch
- 5.4.1. Emergency switch
- 5.4.1.1. Key switch
- 5.4.1.2. Lighting switch
- 5.4.1.3. Turn signal lever
- 5.4.1.4. Horn switch
- 5.4.1.5. Rear assist grip with horn switch
- 5.4.1.6. Work light switch Option
- 5.5. Traveling device
- 5.5.1. Overhead guard
- 5.5.1.1. Getting on / off step assist grip
- 5.5.1.2. Seat belt (Retractable type)
- 5.5.1.3. Storage pocket, magazine box
- 5.5.1.4. Back mirror (Rearview mirror)
- 5.5.1.5. Steering wheel
- 5.5.1.6. Tilt steering
- 5.5.1.7. Brake pedal
- 5.5.1.8. Double brake pedal Option
- 5.5.1.9. Parking brake lever
- 5.5.1.10. Directional lever
- 5.5.1.11. Accelerator pedal
- 5.6. Load handling equipment
- 5.6.1. Type of operating levers
- 5.6.1.1. Lift lever / Tilt lever
- 5.6.1.2. Attachment lever Option
- 5.6.1.3. Automatic tilt horizontal stop Option
- 5.6.1.4. Fingertip control Option armrest adjustment
- 5.6.1.5. Load backrest
- 5.6.1.6. Lock pin
- 5.6.1.7. Smooth running system Option
- 5.6.2. Extension fork Option
- 5.6.2.1. For safe handling
- 5.6.2.2. Be prepared for safety
- 5.6.2.3. Handling of extension forks
- 5.6.2.4. Load handling
- 5.7. Other safety devices
- 5.7.1. Back buzzer
- 5.7.1.1. Travel forward chime Option
- 5.7.1.2. Two working lights Option
- 5.7.1.3. Back operation light Option
- 5.7.1.4. Revolving light Option
- 5.7.1.5. Rear LED line Option
- 5.7.1.6. LED blue spotlight Option
- 5.7.1.7. LED spotlight Option
- 5.8. Other optional equipment
- 5.8.1. Front window Option
- 5.8.1.1. Rear window Option
- 5.8.1.2. Plastic cabin Option
- 5.8.1.3. AOS (Advanced Operation System) Option
- 5.8.1.4. Fire extinguisher Option
- 6. OPERATION
- 6.1. Before turning the key switch to the ON position
- 6.1.1. Boarding and getting off
- 6.1.1.1. Seat adjustment
- 6.1.1.2. Adjusting the steering wheel
- 6.1.1.3. Adjustment of back mirror (Rear view mirror)
- 6.1.1.4. Turn the key switch to ON.
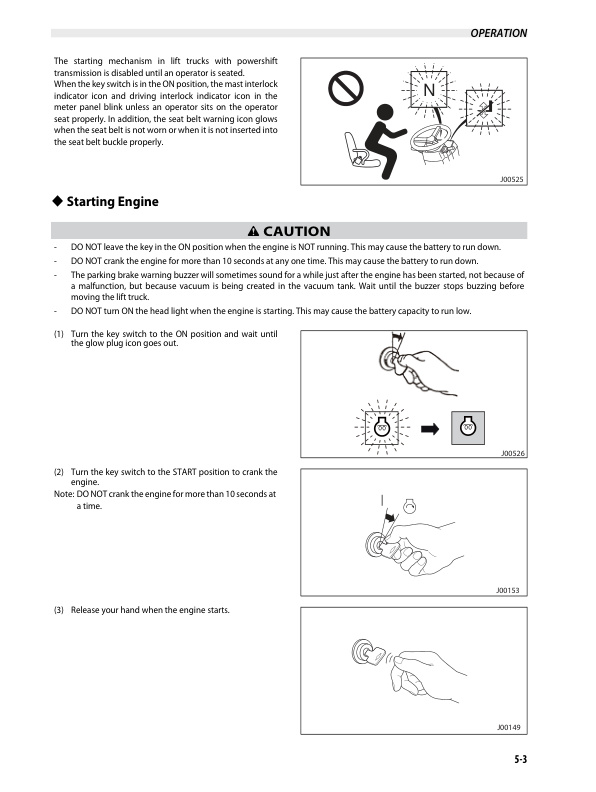
- 6.2. How to start
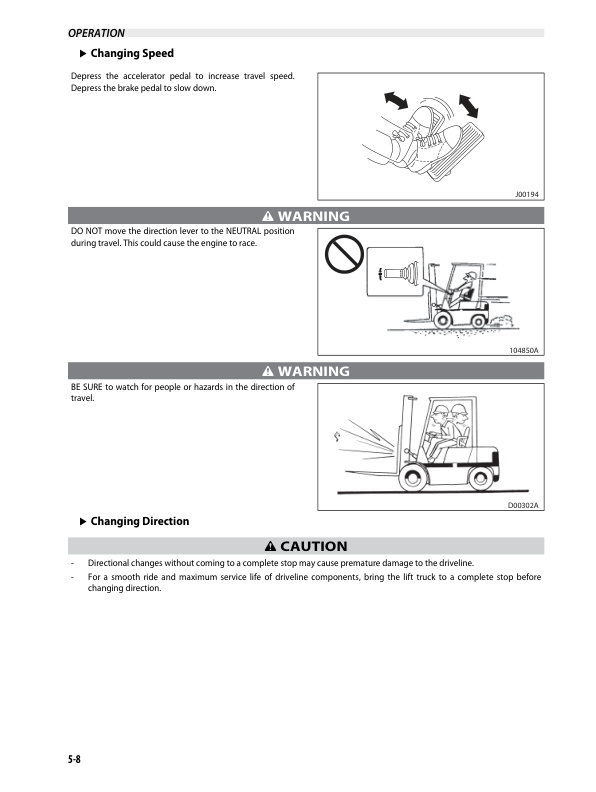
- 6.3. How to switch between forward and backward
- 6.3.1. Switching after stopping the truck by operating the brake
- 6.3.1.1. Switching by plugging operation while traveling
- 6.4. How to travel
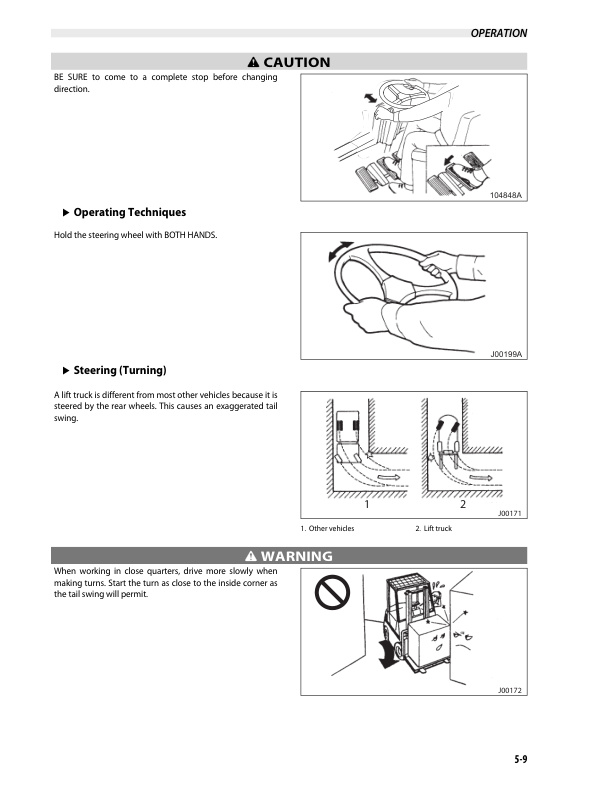
- 6.5. How to turn
- 6.6. How to stop the truck
- 6.7. How to park the truck
- 6.7.1. Parking in cold weather
- 7. LOAD HANDLING
- 7.1. Before load handling
- 7.1.1. Fork spread adjustment
- 7.1.1.1. Secure loading
- 7.2. Unstacking operation
- 7.3. Stacking operation
- 7.4. Traveling with a load
- 8. BATTERY AND CHARGER
- 8.1. Handling the battery
- 8.1.1. Fire prohibited
- 8.1.1.1. Caution for running out of electrolyte
- 8.1.1.2. Be careful of ventilation
- 8.1.1.3. Be careful of over-discharge
- 8.1.1.4. Keep the battery dry and clean
- 8.1.1.5. Pay attention to static electricity
- 8.1.1.6. Beware of electric shock
- 8.2. Safety guidelines for lead-acid batteries for electric vehicles and lead-acid batteries for small electric vehicles
- 8.2.1. Safe handling
- 8.2.1.1. Daily inspection
- 8.2.1.2. Maintenance
- 8.2.1.3. Storage (Place)
- 8.2.1.4. Handling of electrolyte
- 8.2.1.5. Handling of an end-of-life battery and disposal of the used battery
- 8.2.1.6. What to do if something goes wrong
- 8.3. Notes for charging
- 8.3.1. Never let the battery run out of electrolyte
- 8.3.1.1. Use distilled or purified water
- 8.3.1.2. Do not overcharge
- 8.3.1.3. Beware of electric shock
- 8.3.1.4. Charge in a well-ventilated place
- 8.3.1.5. Check the specific gravity
- 8.3.1.6. Inspection of charger and power supply plugs
- 8.3.1.7. Insertion and removal of plug
- 8.3.1.8. Interruption of charge
- 8.3.1.9. Process before charging
- 8.3.1.10. Precautions after charging
- 8.4. Handling of the charger
- 8.4.1. Transformer tap adjustment
- 8.5. About the charger
- 8.6. Type of charge
- 8.6.1. Normal charge
- 8.6.1.1. Equal (Balancing) charge
- 8.6.1.2. Reserved charge (Built-in charger) Option
- 8.6.1.3. Supplementary charge
- 8.7. Name of each part
- 8.7.1. Automatic battery fluid supply Option
- 8.8. How to charge
- 8.8.1. Preparation to charge
- 8.8.2. How to charge (Built-in charger) Option
- 8.8.2.1. AUTO (Normal) charge
- 8.8.2.2. EQUAL charge
- 8.8.2.3. RESERVE charge Option
- 8.8.3. Reserved charge procedure
- 8.8.3.1. Basic rules for operation of the meter panel screen
- 8.8.3.2. Procedure of the reserved charge
- 8.8.4. Charging
- 8.8.5. After charge
- 8.8.6. Processing after charge
- 8.8.6.1. Supplementary charge
- 8.8.7. Charge for long term storage
- 8.9. Error code and abnormal code related to charge
- 8.9.1. List of error and abnormal code
- 8.10. Charge with the stationary charger
- 8.10.1. Names and functions of each part
- 8.10.1.1. Charger
- 8.10.2. How to handle the charger
- 8.10.2.1. How to install the charger
- 8.10.3. How to charge
- 8.10.3.1. Before to charge
- 8.10.3.2. Start to charge
- 8.10.3.3. Completion of charge
- 8.10.4. Inspection and treatment in case of abnormality
- 8.10.4.1. Periodic inspection
- 8.10.4.2. Treatment for abnormality
- 8.10.4.3. Precautions for disposal
- 9. PRE-OPERATION INSPECTION AND SIMPLE MAINTENANCE
- 9.1. What is a pre-operation inspection
- 9.2. Precautions for inspection
- 9.2.1. Preparation before inspection
- 9.2.1.1. After inspection
- 9.3. List of items for a pre-operation inspection
- 9.4. How to a perform Pre-operation inspection, adjustment, and replenishment
- 9.4.1. Abnormal parts on the previous day
- 9.4.1.1. Abnormal parts
- 9.4.2. Around the truck
- 9.4.2.1. Truck Posture
- 9.4.2.2. Oil (inspect leakage)
- 9.4.2.3. Lights (inspect dirt or damage)
- 9.4.2.4. Load backrest and Overhead guard (inspect damage or ill-fitting)
- 9.4.2.5. Tilt cylinder rod and lock nut (inspect looseness)
- 9.4.2.6. Tire and rim (inspect damage)
- 9.4.2.7. Wheel nut (inspect looseness)
- 9.4.2.8. Tires (inspect air pressure)
- 9.4.2.9. Brake fluid (inspect level)
- 9.4.2.10. Hydraulic oil (inspect level)
- 9.4.3. Open the battery cover
- 9.4.3.1. Opening and closing the battery cover
- 9.4.3.2. Electrolyte (inspect level)
- 9.4.4. In the operators seat
- 9.4.4.1. Seat position
- 9.4.4.2. Seat belt
- 9.4.4.3. Brake pedal (inspect working)
- 9.4.4.4. Parking brake lever (inspect working)
- 9.4.4.5. Horn (inspect sound)
- 9.4.4.6. Rearview mirror (inspect dirt or damage)
- 9.4.4.7. Lights (inspect working)
- 9.4.4.8. Brake light (inspect working)
- 9.4.4.9. Steering wheel (inspect play and wobble)
- 9.4.5. Turn the key switch to the ON position
- 9.4.5.1. Turn signals (inspect working)
- 9.4.5.2. Back up light and back buzzer (inspect working)
- 9.4.5.3. Meter panel screen (inspect working)
- 9.4.6. In slow operation (Traveling, load handling and steering)
- 9.4.6.1. Steering wheel (inspect working)
- 9.4.6.2. Brake (inspect working)
- 9.4.6.3. Motor (inspect noise and vibration)
- 9.4.6.4. Drive unit (inspect noise and vibration)
- 9.4.7. After stopping
- 9.4.7.1. Lift chain (inspect tension)
- 9.4.7.2. Forks (inspect fitting)
- 9.4.8. During operation(Load handling and steering)
- 9.4.8.1. Mast (inspect working)
- 9.4.8.2. Laser pointer (inspect working) Option
- 9.4.8.3. Automatic tilt horizontal stop (inspect working) Option


Caterpillar Operation Manual PDF
Caterpillar DP60N3-100N3 Lift Trucks Operation and Maintenance Manual OCFEE-J04C4-201
Caterpillar Operation Manual PDF
Caterpillar DP100NM1, DP120NM1, DP135NM1, DP150NM1 Operation and Maintenance Manual 99790-67100
Caterpillar Operation Manual PDF
Caterpillar DP100NM1 to DP150NM1S Operation and Maintenance Manual 99790-47120
%20Diesel%20Engine%20Disassembly%20and%20Assembly%20SENB8271&url=https://ownersmanualpdf.net/docs/caterpillar-2-5-liter-xd3p-diesel-engine-disassembly-and-assembly-senb8271/&media=https://ownersmanualpdf.net/wp-content/uploads/2025/10/caterpillar-25-liter-xd3p-diesel-engine-disassembly-and-assembly-senb8271-1.jpg)
Caterpillar Operation Manual PDF
Caterpillar 2.5 Liter (XD3P) Diesel Engine Disassembly and Assembly SENB8271
Caterpillar Operation Manual PDF
Caterpillar 4.236 Gasoline Engine Specifications Systems Operation Testing and Adjusting SENB8081-03
Caterpillar Operation Manual PDF
Caterpillar DP100NM1 to DP150NM1S Operation and Maintenance Manual 99790-47110
Caterpillar Operation Manual PDF
Caterpillar DP100, DP115, DP135, DP150 Operation and Maintenance Manual 99790-83130
Caterpillar Operation Manual PDF
Caterpillar 2P3000 to 2PD7000, GP15NM-35NM Operation and Maintenance Manual 99710-8MH00
Caterpillar Operation Manual PDF
Caterpillar AOS EP-CB, NRS-CB1, EP-TCB Lift Trucks Operation and Maintenance Manual OCFEM-J0AOS-200
%20Diesel%20Engine%20Specifications%20Systems%20Operation%20Testing%20and%20Adjusting%20SENB8238-03&url=https://ownersmanualpdf.net/docs/caterpillar-2-5-liter-xd3p-diesel-engine-specifications-systems-operation-testing-and-adjusting-senb8238-03/&media=https://ownersmanualpdf.net/wp-content/uploads/2025/10/caterpillar-25-liter-xd3p-diesel-engine-specifications-systems-operation-testing-and-adjusting-senb8238-03-1.jpg)

Caterpillar Operation Manual PDF