


-
Model List:
- FB16PNT, FB18PNT, FB20PNT
- 1. FOREWORD
- 1.1.
- 1.2. How to Use This Manual
- 2. SAFETY RULES FOR FORKLIFT TRUCK OPERATORS
- 2.1. General
- 2.2. Warning Decals, Location
- 2.3. Warning Decals, Description
- 2.4. Safety Rules
- 2.5. Operating Precautions
- 2.6. Working Precautions
- 3. KNOW YOUR FORKLIFT TRUCK
- 3.1. Serial Number and Capacity Plate
- 3.2. Electrical Components
- 3.3. Model View
- 3.4. Driving Switches and Controls
- 3.5. Meter Panel
- 3.6. Integrated Presence System
- 3.7. Parking Brake Warning Buzzer
- 3.8. Operating Switches and Controls (MC Model)
- 3.9. Operator Seat
- 3.10. Seat Belt
- 3.11. Fork Locking Pins
- 3.12. Changing Forks
- 3.13. Drawbar Pin
- 3.14. Assist Grip
- 3.15. Battery Cover
- 3.16. Hydraulic Tank Oil Level / Filler Hole
- 3.17. Brake Reservoir Tank Fluid Level
- 4. HOW TO AVOID A TIPOVER HOW TO SURVIVE ONE
- 4.1. Know What Forklift Truck Stability Is
- 4.2. Center of Gravity (CG)
- 4.3. Stability and Center of Gravity (Top View)
- 4.4. Stability and Center of Gravity
- 4.5. Capacity (Weight and Load Center)
- 4.5.1. Capacity (Weight and Load Center)
- 4.6. Capacity Plate
- 4.7. Dos and Donts to Avoid Tipover
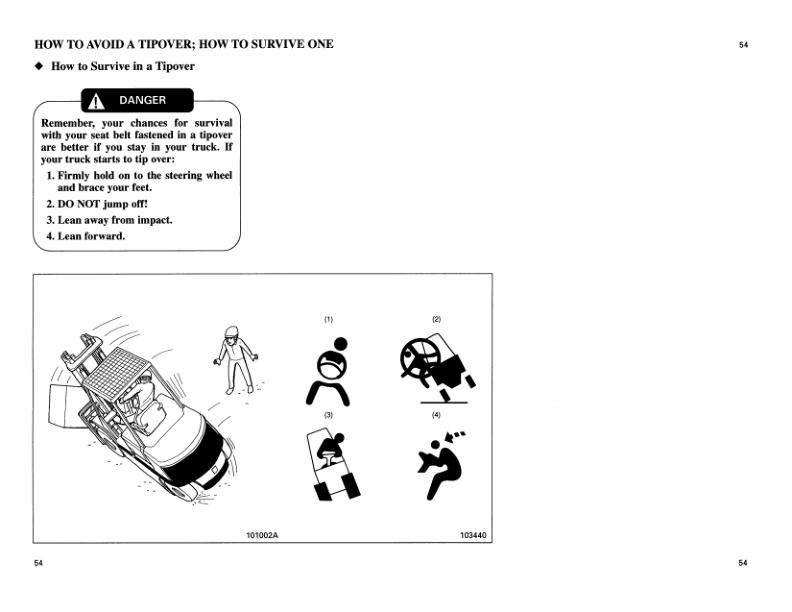
- 4.8. How to Survive in a Tipover
- 5. OPERATION
- 5.1. New Forklift Truck Break-In
- 5.2. Before Starting
- 5.3. Check Central Vehicle Monitoring System
- 5.4. Before Moving Forklift Truck
- 5.5. Forklift Truck Operation
- 5.6. Stopping Forklift Truck
- 5.7. Parking Forklift Truck (After Stopping)
- 5.8. Leaving Forklift Truck
- 6. OPERATING TECHNIQUES
- 6.1. Stacking Methods
- 6.2. Handling Loads Safely
- 6.3. Operating Steps
- 6.4. Flickering of the Interlock Indicator Light
- 6.5. Inching into and Lifting the Load
- 6.6. Traveling with the Load
- 6.7. Unloading
- 6.8. Working on Grades
- 7. STORING THE FORKLIFT TRUCK
- 7.1. End of Each Shift Storage
- 7.2. Long Term Storage
- 8. TRANSPORTATIONS HINTS
- 8.1. Forklift Truck Loading and Shipping
- 8.2. Forklift Truck Lifting and Tiedown Information
- 8.3. Operating the Forklift Truck Without Power Supply
- 9. SPECIAL SITUATIONS
- 9.1. Care in Cold Weather
- 9.2. Care in Hot Weather
- 10. TROUBLESHOOTING
- 10.1. If the Truck Shuts Down Suddenly
- 10.2. If Central Vehicle Monitoring System Does Not Come On
- 10.3. If Abnormal Noise Sounds From Electro-Magnetic Brakes
- 10.4. If Light Bulbs Burn Out
- 10.5. If Error Code Light Flickers or Flashes and the Forklift Truck Stop Moving
- 10.6. If the Mast and Attachments Malfunction
- 10.7. Changing Tires
- 10.8. Before Changing a Tire
- 10.9. Manually Releasing Electro-Magnetic Brakes
- 10.10. Error Code List
- 11. MAINTENANCE
- 11.1. General
- 11.2. Inspection Precautions
- 11.2.1. DANGER
- 11.2.2. DO NOT OPERATE
- 11.3. Maintenance Schedule
- 11.3.1. Every 10 Service Hours or Daily (Pre-Start), Whichever Comes First
- 11.3.2. Every 50 Service Hours or Weekly, Whichever Comes First
- 11.3.3. One Month (30 days) or 200 Service Hours After Delivery of a New Truck, Whichever Comes First
- 11.3.3.1. Every 1000 Service Hours or 6 Months, Whichever Comes First
- 11.3.3.2. Every 2000 Service Hours or 1 year, Whichever Comes First
- 11.4. Every 10 Service Hours or Daily (Pre-Start), Whichever Comes First
- 11.4.1. Faulty Operation Found the Day Before
- 11.4.2. Oil or Battery Electrolyte Leaks
- 11.4.3. Tires and Rims
- 11.4.3.1. Unit 5 mm (0.2 in.)
- 11.4.4. Wheel Nuts
- 11.4.4.1. Stand behind the tread of the tire, NOT in front of the rim.
- 11.4.4.2. Tighten the nuts evenly and in a diagonal sequence to the specified torque.
- 11.4.5. Head Light and Rear Light (Option)
- 11.4.6. Hydraulic Hoses, Pipes, and Joints
- 11.4.7. Load Backrest Extension, Lift Bracket
- 11.4.7.1. Load backrest extension
- 11.4.7.2. Lift bracket
- 11.4.8. Lift Cylinder and Tilt Cylinder
- 11.4.8.1. Lift cylinder
- 11.4.8.2. Tilt cylinder
- 11.4.9. Tilt Cylinder Socket Bolts
- 11.4.9.1. Carefully inspect the forks for cracks. Special attention should be given to the heel section, all weld areas and mounting brackets (2).
- 11.4.9.2. Check the difference in height of one fork tip to the other when mounted on the lift bracket. Also check each fork for its deviation by setting a straight fork length pole against the fork to measure a difference in height between the fork tip an…
- 11.4.9.3. Check the fork blade.
- 11.4.10. Overhead Guard
- 11.4.11. Assist Grip
- 11.4.12. Brake Fluid Level
- 11.4.12.1. Open the tank panel.
- 11.4.12.2. Remove the reservoir cap.
- 11.4.12.3. Check the brake fluid level at the reservoir.
- 11.4.12.4. If the brake fluid level is less than the MIN marks on the reservoir, add the brake fluid so that the fluid level is within MAX and MIN marks.
- 11.4.13. Hydraulic Oil Level
- 11.4.13.1. Operate the forklift truck for a few minutes to warm the oil.
- 11.4.13.2. Park the forklift truck on a level surface, with the forks lowered, parking brake applied, the direction lever in NEUTRAL position, the battery disconnected, and the wheels blocked.
- 11.4.13.3. Remove the floor mat.
- 11.4.13.4. Remove the floor plate.
- 11.4.13.5. Check the hydraulic oil level using the gauge of the cap.
- 11.4.13.6. If the oil level is less than the correct level range, add oil so that the oil level is within correct level range.
- 11.4.13.7. Put the cap back on.
- 11.4.13.8. Check for oil leaks.
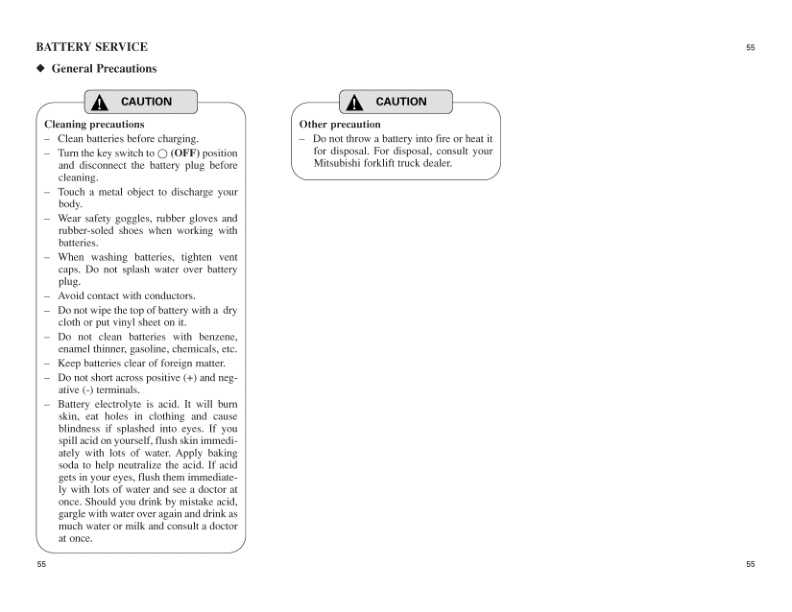
- 11.4.14. Battery Electrolyte
- 11.4.14.1. Open the battery cover.
- 11.4.14.2. Open the vent cap.
- 11.4.14.3. Check to see if the white line (indicator) on the float (amber) is visible.
- 11.4.14.4. If the indicator is not visible, the electrolyte level is low. Need to add distilled water.
- 11.4.14.5. Clean the top of the battery and open vent caps and add distilled water to all cells.
- 11.4.14.6. Stop adding water just when the white indicator becomes visible.
- 11.4.14.7. Set the vent caps and wipe the top of the battery with a saturated cloth after filling.
- 11.4.15. Operator Seat
- 11.4.15.1. Slide lever
- 11.4.16. Seat Belt
- 11.4.17. Accelerator Pedal
- 11.4.18. Brake Pedal
- 11.4.18.1. Horn switch (MC model)
- 11.4.19. Parking Brake Switch
- 11.4.19.1. Apply
- 11.4.19.2. Release
- 11.4.20. Key Switch and Meter Panel
- 11.4.20.1. Turn the key switch to the ON position.
- 11.4.20.2. All lights of the display panel flash, and after 1 second they go out.
- 11.4.20.3. Then the normal screen is displayed.
- 11.4.21. Battery Charge Level
- 11.4.21.1. Full charged
- 11.4.21.2. Less than 20
- 11.4.21.3. Less than 10
- 11.4.21.4. Empty
- 11.4.21.5. Charge the battery immediately
- 11.4.22. Steering Wheel and Column
- 11.4.23. Lift Chains
- 11.4.23.1. Loosen the lock nut and clamp.
- 11.4.23.2. Turn the nut to adjust tension.
- 11.4.23.3. Hold the nut and tighten the clamp.
- 11.4.23.4. Hold the nut and tighten the lock nut to the specified torque.
- 11.4.24. Mast Interlock System
- 11.4.24.1. Release the accelerator pedal and apply the brake pedal.
- 11.4.24.2. Raise the forks high enough to see them from the operator seat.
- 11.4.24.3. Apply the parking brake.
- 11.4.24.4. Place the direction lever to the NEUTRAL position.
- 11.4.24.5. Half rise from the operator seat.
- 11.4.24.6. Check the following after 2 seconds
- 11.4.25. Driving Interlock System
- 11.4.25.1. Slightly raise the forks from the floor.
- 11.4.25.2. Turn the key switch to ON position.
- 11.4.25.3. Place the direction lever to the FORWARD or REVERSE position.
- 11.4.25.4. Half rise from the operator seat.
- 11.4.25.5. Check the following after 2 seconds.
- 11.4.25.6. Sit properly in the operator seat and press the brake pedal to hold the forklift truck.
- 11.4.25.7. Return the direction lever to the NEUTRAL position, then place the lever to the FORWARD or REVERSE position.
- 11.4.25.8. Push the parking brake switch to apply once and then push the switch to release.
- 11.4.26. Parking Brake Warning Buzzer
- 11.4.26.1. Park the forklift truck on level ground.
- 11.4.26.2. Lower the forks until the fork tips touch the floor.
- 11.4.26.3. Apply the parking brake.
- 11.4.26.4. Place the direction lever in the NEUTRAL position.
- 11.4.26.5. Block the wheels.
- 11.4.26.6. Remove the key.
- 11.4.26.7. Release the parking brake and leave the operator seat.
- 11.4.26.8. After approximately 2 seconds, check that the warning buzzer will activate.
- 11.4.26.9. Apply the parking brake.
- 11.4.27. Driving Control System (Traction Motors, Steering System and Brake System)
- 11.4.28. Rear Axle Steering Gear (3-Wheel Model)
- 11.4.29. Parking Brake (PKB) Check Mode
- 11.4.30. Turn the key switch to the ON position and screen 1 appears.
- 11.4.31. Push Mode button and screen 2 appears.
- 11.4.32. Move the cursor to PKB CHECK MODE by pushing the t or y button.
- 11.4.33. Push (R) button. Then screen 4 appears.
- 11.4.34. No error code indicated on display.
- 11.4.35. PKB switch applied.
- 11.4.36. Accelerator pedal released.
- 11.4.37. Directional lever in NEUTRAL position.
- 11.4.38. Traveling speed must be 0 Km/h.
- 11.4.39. Steer tire angle must be straight by tire indicator on the display.
- 11.4.40. Move the direction lever to the FORWARD or REVERSE position.
- 11.4.41. Slowly press the accelerator pedal to the floor or full position. while pressing the accelerator pedal, <> mark on the display moves to indicate the PKB check mode is operating. If the forklift truck moves, it will automatically shut OFF after…
- 11.4.42. Hold the accelerator pedal to the floor or full position for 5-10 seconds and confirm that the forklift truck does not move.
- 11.4.43. Release the accelerator pedal and move the direction lever to the NEUTRAL position.
- 11.4.44. Turn the key switch to the OFF position to exit the PKB CHECK MODE.
- 11.4.45. Every 50 Service Hours Or Weekly, Whichever Comes First
- 11.4.45.1. Bolts and Nuts
- 11.4.45.2. Battery Electrolyte Specific Gravity
- 11.4.46. One Month (30 days) or 200 Service Hours After Delivery of a New Truck, Whichever Comes First
- 11.4.46.1. Electrical Wires
- 11.4.46.2. Contactors and Fuses
- 11.4.46.3. Microswitches and Steering Sensor
- 11.4.46.4. Chain Wheel
- 11.4.47. Every 1000 Service Hours or 6 Months, Whichever Comes First
- 11.4.47.1. Wheel Bearings
- 11.4.47.2. Drift Lowering Distance of Lift Cylinders
- 11.4.47.3. Drift Forward Tilting Distance of Tilt Cylinders
- 11.4.47.4. Hydraulic Tank Filters
- 11.4.47.5. Transfer Oil
- 11.4.47.6. Mast Supports
- 11.4.47.7. Tilt Sockets
- 11.4.47.8. Lift Chains
- 11.4.47.9. Mast Strips and Roller Surfaces
- 11.4.48. Every 2000 Service Hours or 1 Year, Whichever Comes First
- 11.4.48.1. Hydraulic Oil
- 11.4.48.2. Brake Fluid
- 11.4.49. Parts to Be Changed Periodically
- 12. SERVICE DATA
- 12.1. Recommended Oils and Greases
- 12.2. Specifications (Standard Models)
- 12.3. Capacities and Forklift Truck Weight (Standard Models)
- 13. TO THE MITSUBISHI FORKLIFT TRUCK OWNER
- 13.1. The Importance of Genuine Parts
- 13.2. Proper Disposal of Your Forklift Truck
- 13.3. Instructions for Ordering Parts
- 13.4. Service Registration
- 13.5. Transfer of Ownership Report for Mitsubishi Folklift Trucks Customers Only
- 14. APPENDIX
- 14.1. Description of Circuit Diagrams
- 14.2. How to Read Circuit Diagrams
- 14.3. How to Read Connector Diagrams
- 14.4. Circuit Diagrams
Mitsubishi Operation Manual PDF
Mitsubishi FB16N, FB18N, FB20CN Forklift Trucks Operation and Maintenance Manual 99750-56100
$30.00
Mitsubishi Operation Manual PDF
Mitsubishi FB25-35(C)N Operation and Maintenance Manual 623321 EN
$30.00
Mitsubishi Operation Manual PDF
Mitsubishi EDR 18N, ESR 20N, ESR 23N Operating and Maintenance Instructions 51326240
$30.00
Mitsubishi Operation Manual PDF
Mitsubishi FB10 to FB25 Operation and Maintenance Manual 99750-12101
$30.00
Mitsubishi Operation Manual PDF
$30.00
Mitsubishi Operation Manual PDF
Mitsubishi FB10-28(H)CA1, FB30CA1 Operation and Maintenance Manual 99710-17110
$30.00
Mitsubishi Operation Manual PDF
Mitsubishi FB16NT, FB18NT, FB20NT Operation and Maintenance Manual 99750-7B100
$30.00
Mitsubishi Operation Manual PDF
Mitsubishi FB13-20TCB, FB16-20TBCB Operation and Maintenance Manual 99750-27100
$30.00
Mitsubishi Operation Manual PDF
Mitsubishi FB16NT, FB18NT, FB20NT Operation and Maintenance Manual 99750-7B111
$30.00
Mitsubishi Operation Manual PDF
Mitsubishi ESR15N2-ESR23N2, EDR18N2 Operating Instructions 51620220
$30.00
N%20Operation%20and%20Maintenance%20Manual%20623321%20EN&url=https://ownersmanualpdf.net/docs/mitsubishi-fb25-35cn-operation-and-maintenance-manual-623321-en/&media=https://ownersmanualpdf.net/wp-content/uploads/2025/10/mitsubishi-fb25-35cn-operation-and-maintenance-manual-623321-en-1.jpg)
,%20FB25AN(-SP),%20FB30ACN(-SP),%20FB30AN(-SP),%20FB35AN(-SP)%20Operation%20and%20Maintenance%20Manual%20657142%20EN%20C&url=https://ownersmanualpdf.net/docs/mitsubishi-fb25acn-sp-fb25an-sp-fb30acn-sp-fb30an-sp-fb35an-sp-operation-and-maintenance-manual-657142-en-c/&media=https://ownersmanualpdf.net/wp-content/uploads/2025/10/mitsubishi-fb25acn-sp-fb25an-sp-fb30acn-sp-fb30an-sp-fb35an-sp-operation-and-maintenance-manual-657142-en-c-1.jpg)
CA1,%20FB30CA1%20Operation%20and%20Maintenance%20Manual%2099710-17110&url=https://ownersmanualpdf.net/docs/mitsubishi-fb10-28hca1-fb30ca1-operation-and-maintenance-manual-99710-17110/&media=https://ownersmanualpdf.net/wp-content/uploads/2025/10/mitsubishi-fb10-28hca1-fb30ca1-operation-and-maintenance-manual-99710-17110-1.jpg)